
 MHSanaei
8698024b61
upgrade go to 1.21
MHSanaei
8698024b61
upgrade go to 1.21
|
2 lat temu | |
|---|---|---|
| .github | 2 lat temu | |
| config | 2 lat temu | |
| database | 3 lat temu | |
| logger | 2 lat temu | |
| media | 2 lat temu | |
| sub | 2 lat temu | |
| util | 3 lat temu | |
| web | 2 lat temu | |
| xray | 2 lat temu | |
| .gitignore | 3 lat temu | |
| DockerEntrypoint.sh | 3 lat temu | |
| DockerInit.sh | 2 lat temu | |
| Dockerfile | 3 lat temu | |
| LICENSE | 3 lat temu | |
| README.md | 2 lat temu | |
| docker-compose.yml | 3 lat temu | |
| go.mod | 2 lat temu | |
| go.sum | 2 lat temu | |
| install.sh | 2 lat temu | |
| main.go | 3 lat temu | |
| x-ui.service | 3 lat temu | |
| x-ui.sh | 2 lat temu |
README.md
3x-ui
Disclaimer: This project is only for personal learning and communication, please do not use it for illegal purposes, please do not use it in a production environment


![]()
3x-ui panel supporting multi-protocol, Multi-lang (English,Farsi,Chinese,Russian,Vietnamese) If you think this project is helpful to you, you may wish to give a :star2:
Buy Me a Coffee :
- Tron USDT (TRC20):
TXncxkvhkDWGts487Pjqq1qT9JmwRUz8CC
Install & Upgrade
bash <(curl -Ls https://raw.githubusercontent.com/mhsanaei/3x-ui/master/install.sh)
Install custom version
To install your desired version you can add the version to the end of install command. Example for ver v1.7.7:
bash <(curl -Ls https://raw.githubusercontent.com/mhsanaei/3x-ui/master/install.sh) v1.7.7
SSL
apt-get install certbot -y
certbot certonly --standalone --agree-tos --register-unsafely-without-email -d yourdomain.com
certbot renew --dry-run
You also can use x-ui menu then select SSL Certificate Management
Features
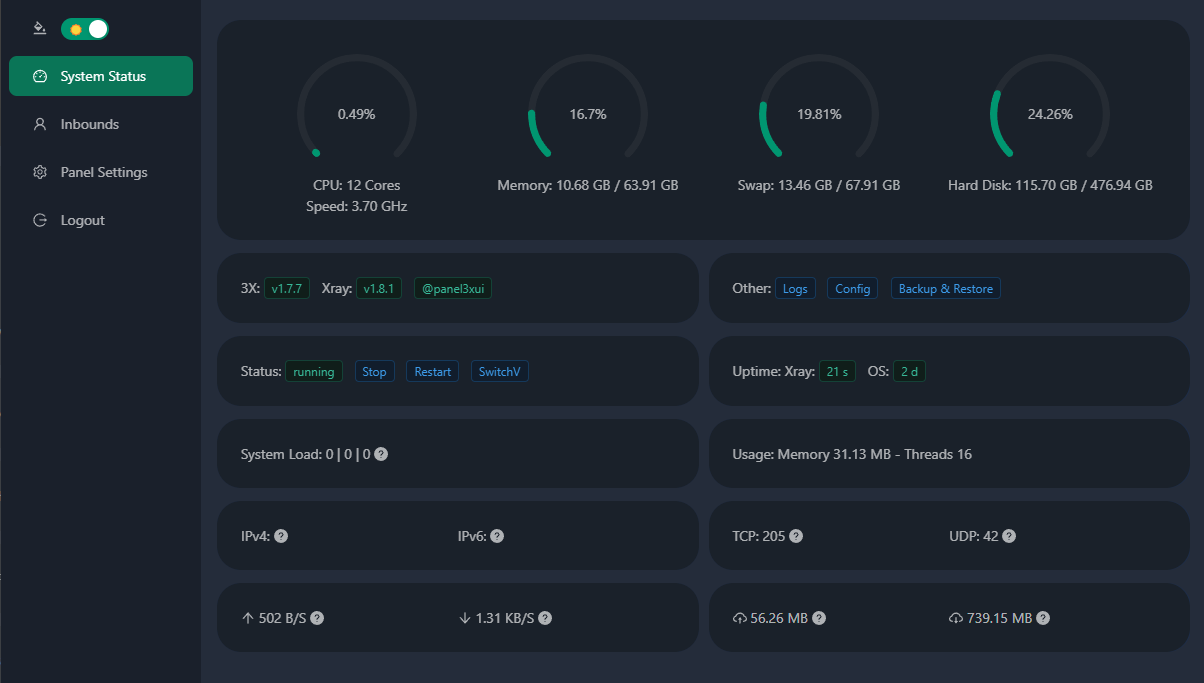
- System Status Monitoring
- Search within all inbounds and clients
- Support Dark/Light theme UI
- Support multi-user multi-protocol, web page visualization operation
- Supported protocols: vmess, vless, trojan, shadowsocks, dokodemo-door, socks, http
- Support for configuring more transport configurations
- Traffic statistics, limit traffic, limit expiration time
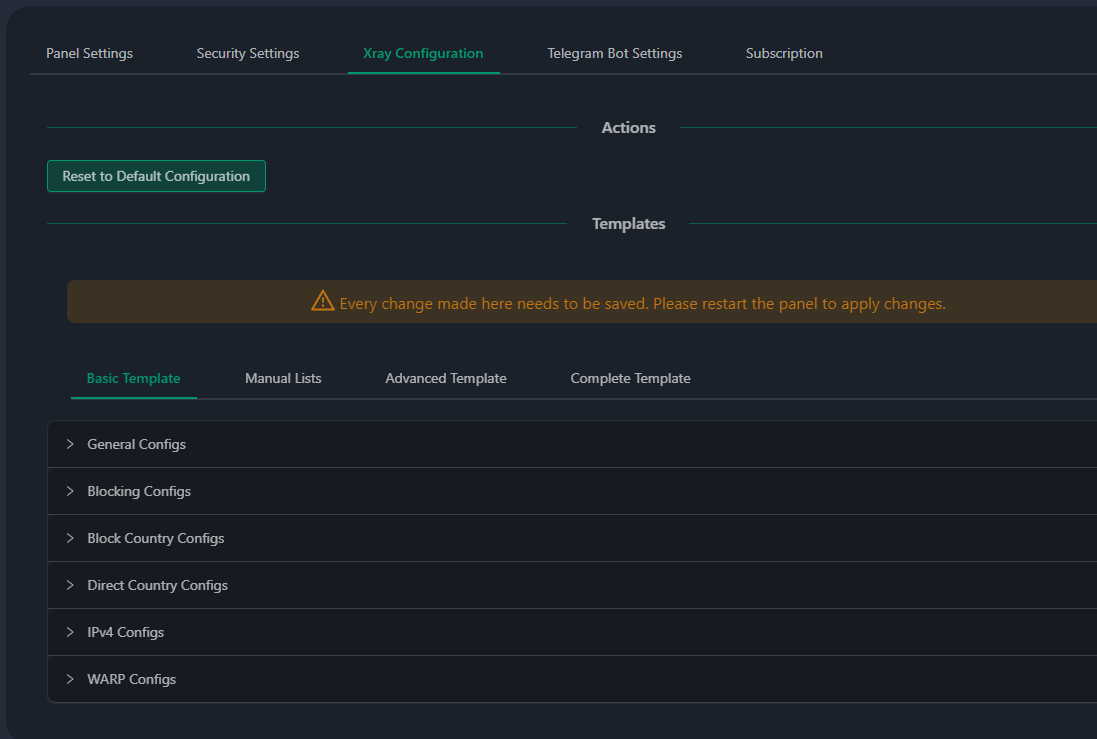
- Customizable xray configuration templates
- Support https access panel (self-provided domain name + ssl certificate)
- Support one-click SSL certificate application and automatic renewal
- For more advanced configuration items, please refer to the panel
- Fix api routes (user setting will create with api)
- Support to change configs by different items provided in panel
- Support export/import database from panel
Manual Install & Upgrade
Click for Manual Install details
1. To download the latest version of the compressed package directly to your server, run the following command: ```sh ARCH=$(uname -m) [[ "${ARCH}" == "aarch64" || "${ARCH}" == "arm64" ]] && XUI_ARCH="arm64" || XUI_ARCH="amd64" wget https://github.com/MHSanaei/3x-ui/releases/latest/download/x-ui-linux-${XUI_ARCH}.tar.gz ``` 2. Once the compressed package is downloaded, execute the following commands to install or upgrade x-ui: ```sh ARCH=$(uname -m) [[ "${ARCH}" == "aarch64" || "${ARCH}" == "arm64" ]] && XUI_ARCH="arm64" || XUI_ARCH="amd64" cd /root/ rm -rf x-ui/ /usr/local/x-ui/ /usr/bin/x-ui tar zxvf x-ui-linux-${XUI_ARCH}.tar.gz chmod +x x-ui/x-ui x-ui/bin/xray-linux-* x-ui/x-ui.sh cp x-ui/x-ui.sh /usr/bin/x-ui cp -f x-ui/x-ui.service /etc/systemd/system/ mv x-ui/ /usr/local/ systemctl daemon-reload systemctl enable x-ui systemctl restart x-ui ```Install with Docker
Click for Docker details
1. Install Docker: ```sh bash <(curl -sSL https://get.docker.com) ``` 2. Clone the Project Repository: ```sh git clone https://github.com/MHSanaei/3x-ui.git cd 3x-ui ``` 3. Start the Service ```sh docker compose up -d ``` OR ```sh docker run -itd \ -e XRAY_VMESS_AEAD_FORCED=false \ -v $PWD/db/:/etc/x-ui/ \ -v $PWD/cert/:/root/cert/ \ --network=host \ --restart=unless-stopped \ --name 3x-ui \ ghcr.io/mhsanaei/3x-ui:latest ```Default settings
Click for Default settings details
- Port: 2053 - username and password will be generated randomly if you skip to modify your own security(x-ui "7") - database path: /etc/x-ui/x-ui.db - xray config path: /usr/local/x-ui/bin/config.json Before you set ssl on settings - http://ip:2053/panel - http://domain:2053/panel After you set ssl on settings - https://yourdomain:2053/panelXray Configurations:
Click for Xray Configurations details
**copy and paste to xray Configuration :** (you don't need to do this if you have a fresh install) - [traffic](./media/configs/traffic.json) - [traffic + Block all Iran IP address](./media/configs/traffic+block-iran-ip.json) - [traffic + Block all Iran Domains](./media/configs/traffic+block-iran-domains.json) - [traffic + Block Ads + Use IPv4 for Google](./media/configs/traffic+block-ads+ipv4-google.json) - [traffic + Block Ads + Route Google + Netflix + Spotify + OpenAI (ChatGPT) to WARP](./media/configs/traffic+block-ads+warp.json)WARP Configuration (Optional)
Click for WARP Configuration details
If you want to use routing to WARP follow steps as below: 1. If you already installed warp, you can uninstall using below command: ```sh warp u ``` 2. Install WARP on **socks proxy mode**: ```sh bash <(curl -sSL https://raw.githubusercontent.com/hamid-gh98/x-ui-scripts/main/install_warp_proxy.sh) ``` 3. Turn on the config you need in panel or [Copy and paste this file to Xray Configuration](./media/configs/traffic+block-ads+warp.json) Config Features: - Block Ads - Route Google + Netflix + Spotify + OpenAI (ChatGPT) to WARP - Fix Google 403 errorIP Limit
Click for IP Limit details
**Note: IP Limit won't work correctly when using IP Tunnel** - For versions up to `v1.6.1`: - IP limit is built-in into the panel. - For versions `v1.7.0` and newer: - To make IP Limit work properly, you need to install fail2ban and its required files by following these steps: 1. Use the `x-ui` command inside the shell. 2. Select `IP Limit Management`. 3. Choose the appropriate options based on your needs.Telegram Bot
Click for Telegram Bot details
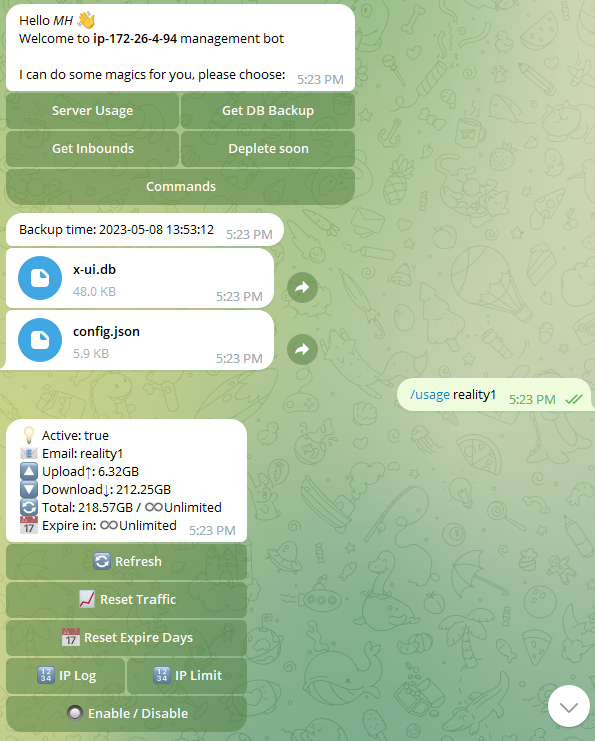
X-UI supports daily traffic notification, panel login reminder and other functions through the Tg robot. To use the Tg robot, you need to apply for the specific application tutorial. You can refer to the [blog](https://coderfan.net/how-to-use-telegram-bot-to-alarm-you-when-someone-login-into-your-vps.html) Set the robot-related parameters in the panel background, including: - Tg robot Token - Tg robot ChatId - Tg robot cycle runtime, in crontab syntax - Tg robot Expiration threshold - Tg robot Traffic threshold - Tg robot Enable send backup in cycle runtime - Tg robot Enable CPU usage alarm threshold Reference syntax: - 30 \* \* \* \* \* //Notify at the 30s of each point - 0 \*/10 \* \* \* \* //Notify at the first second of each 10 minutes - @hourly // hourly notification - @daily // Daily notification (00:00 in the morning) - @weekly // weekly notification - @every 8h // notify every 8 hours # Telegram Bot Features - Report periodic - Login notification - CPU threshold notification - Threshold for Expiration time and Traffic to report in advance - Support client report menu if client's telegram username added to the user's configurations - Support telegram traffic report searched with UUID (VMESS/VLESS) or Password (TROJAN) - anonymously - Menu based bot - Search client by email ( only admin ) - Check all inbounds - Check server status - Check depleted users - Receive backup by request and in periodic reports - Multi language botSetting up Telegram bot
Start Botfather in your Telegram account:
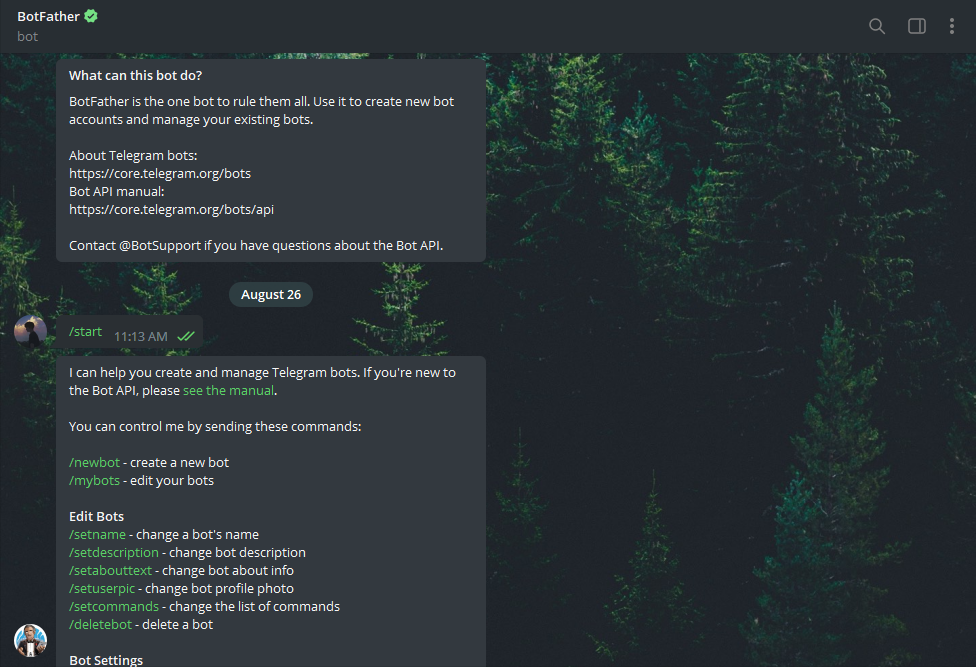
Create a new Bot using /newbot command: It will ask you 2 questions, A name and a username for your bot. Note that the username has to end with the word "bot".
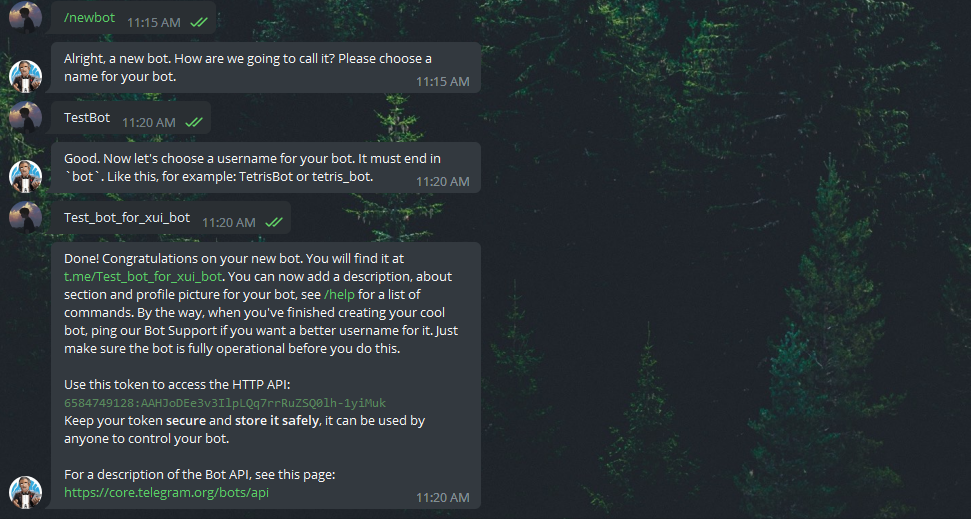
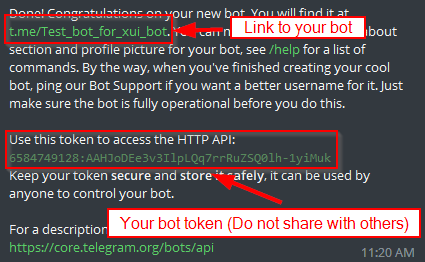
Start the bot you've just created. You can find the link to your bot here.
Enter your panel and config Telegram bot settings like below:
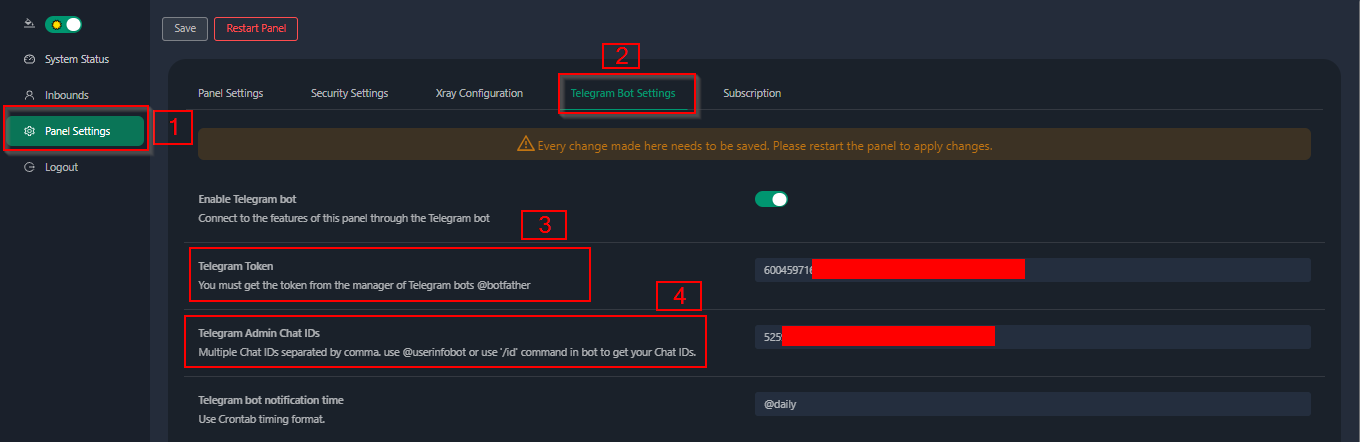
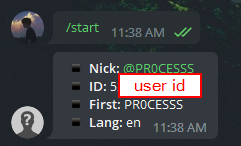
Enter your bot token in input field number 3. Enter the user ID in input field number 4. The Telegram accounts with this id will be the bot admin. (You can enter more than one, Just separate them with ,)
- How to get Telegram user ID? Use this bot, Start the bot and it will give you the Telegram user ID.
API routes
Click for API routes details
- `/login` with `POST` user data: `{username: '', password: ''}` for login - `/panel/api/inbounds` base for following actions: | Method | Path | Action | | :----: | ---------------------------------- | ------------------------------------------- | | `GET` | `"/list"` | Get all inbounds | | `GET` | `"/get/:id"` | Get inbound with inbound.id | | `GET` | `"/getClientTraffics/:email"` | Get Client Traffics with email | | `GET` | `"/createbackup"` | Telegram bot sends backup to admins | | `POST` | `"/add"` | Add inbound | | `POST` | `"/del/:id"` | Delete Inbound | | `POST` | `"/update/:id"` | Update Inbound | | `POST` | `"/clientIps/:email"` | Client Ip address | | `POST` | `"/clearClientIps/:email"` | Clear Client Ip address | | `POST` | `"/addClient"` | Add Client to inbound | | `POST` | `"/:id/delClient/:clientId"` | Delete Client by clientId\* | | `POST` | `"/updateClient/:clientId"` | Update Client by clientId\* | | `POST` | `"/:id/resetClientTraffic/:email"` | Reset Client's Traffic | | `POST` | `"/resetAllTraffics"` | Reset traffics of all inbounds | | `POST` | `"/resetAllClientTraffics/:id"` | Reset traffics of all clients in an inbound | | `POST` | `"/delDepletedClients/:id"` | Delete inbound depleted clients (-1: all) | \*- The field `clientId` should be filled by: - `client.id` for VMESS and VLESS - `client.password` for TROJAN - `client.email` for Shadowsocks - [Postman Collection](https://gist.github.com/mehdikhody/9a862801a2)
Environment Variables
Click for Environment Variables details
| Variable | Type | Default | | -------------- | :--------------------------------------------: | :------------ | | XUI_LOG_LEVEL | `"debug"` \| `"info"` \| `"warn"` \| `"error"` | `"info"` | | XUI_DEBUG | `boolean` | `false` | | XUI_BIN_FOLDER | `string` | `"bin"` | | XUI_DB_FOLDER | `string` | `"/etc/x-ui"` | | XUI_LOG_FOLDER | `string` | `"/var/log"` | Example: ```sh XUI_BIN_FOLDER="bin" XUI_DB_FOLDER="/etc/x-ui" go build main.go ```A Special Thanks To
Acknowledgment
- Iran Hosted Domains (License: MIT): A comprehensive list of Iranian domains and services that are hosted within the country.
- PersianBlocker (License: AGPLv3): An optimal and extensive list to block ads and trackers on Persian websites.
Suggestion System
- Ubuntu 20.04+
- Debian 10+
- CentOS 8+
- Fedora 36+
- Arch Linux
Pictures
Stargazers over time
